You can log in to the admin panel of your JioFi WiFi modem through the IP address at HTTP://jiofi.local.html manage all the settings and most importantly change the default username and password. This is what you need to do after buying a JioFi modem.
Why you should do this?
It is all about security. We need to prevent unauthorized access to our modem. As you live in this modern world, you know how it affects unauthorized access to our private WiFi network. The hackers can gain control over your Wi-Fi network, monitor your online activity, or even steal sensitive information.
There is a default SSID and password for the modem and while you are not changing them to some credential, you leave your network vulnerable and allow access to external users.
Customizing the SSID and password gives your network an extra protection layer of security. Ensure to provide a strong network name and a double-strong password that no one can assume and penetrate to the network.
In this guide, I’ll show you how to change the Jiofi default username and password with step by step guide.
How to log in to the Jiofi admin dashboard with Jiofi.local.html?
You can log in to the admin panel either through your mobile phone or your computer PC. But make sure the device is connected to the JioFi modem with the SSID and password denoted in the battery compartment of the JioFi.
Then,
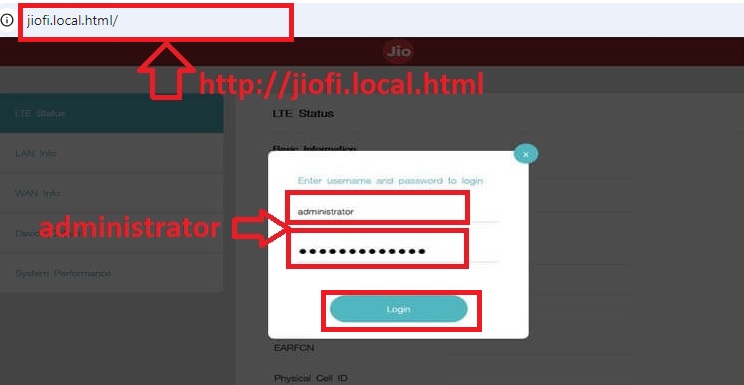
Open any web browser and enter the IP HTTP://jiofi.local.html in the address bar and enter.
A login window will pop up to enter the default username and password of your WiFi network.
So, what is the default username (Called SSID) and password? The answer is ‘administrator‘.

Enter administrator in both the username and password fields to log in.
Note:- You can either log in through jiofi.local.html or 192.168.1.1
You may like to read:- The JioFi red light blinking issue fix
How to change JioFi SSID and password?
In the dashboard at HTTP://jiofi.local.html/index.html, select the ‘NETWORK‘ tab on the top bar and see different options to manage the settings like WiFi, network, LAN, storage, user management, firmware update, WPS, etc.
We only need one option to quickly update the SSID and password from here.
Click on the WiFi on the left side portion of the page. It’ll show you all the ‘WiFi settings‘.
Under the tab, you need to notify two fields such as
- SSID
- Security Key
Both fields are already filled with the SSID and the password denoted on the modem battery compartment.
Edit the fields with your desired SSID name and password (security key).
The SSID name can be anything that you wish to name your WiFi network such as your company name, creative name, shop name, your name, etc.
The next parameter is the WiFi password. This should be strong enough that no one can guess. If you update with a simple password, it makes it easy to be hacked.
Try to create a password that mixes small letters, capital letters, numbers, and special characters. Do not forget to note down the password in your personal spaces like in a diary, mobile, or Google Drive.
After editing both fields, click on the Apply & then Update button to update the default username and password.
Other WiFi settings configurations
We can see different other settings under the WiFi settings.
Make sure they are as follows to get maximum performance on your WiFi network.
- 802.11 Mode – 2.4 GHz (B+G+N)
- WMM – Enable
- Tx power – High
- Wireless security – WPA2-PSK
- Wireless encryption type – AES
- Channel mode – Automatic
- SSID Broadcast – Enable
- WiFi Module – Enable
Wireless security – WPA2-PSK
WiFi-protected access 2 (Pre-shared Key) is a network security protocol that only allows access to authorized users. WPA2 is the most used security system in a wireless network. It encrypts the communication between your connected device and the router and thus prevents unauthorized access.
There could be more options for selecting this parameter such as WPA and WEP protocols in the admin dashboard of any router. Rather than selecting these low-security protocols, use WPA2.
WPA2 is strongly recommended because it provides high-end security to home and small business WiFi networks. Since the network traffic is encrypted here, the hackers can’t intercept on your network data. Strong and a unique password (Here is the security key) is a must while using the WPA2 that we have already set with the previous step.
Additionally while using the wireless encryption type as AES (advanced encryption system) we provide more security to our network.
FAQ
What is jiofi.local.html?
Jiofi.local.html is an entry IP address to access the admin panel of the JioFi device. It points to a specific IP address like 192.168.1.1. To simplify the admin panel navigation, Jio introduced this mode of IP address for the users.
How to connect JioFi to a computer or mobile?
Long press the power button on the modem to turn on it. The device is now ready to connect with your WiFi device. To connect with it, you need to know the SSID and password.
If you haven’t changed the pre-set SSID and security key of the device, these credentials can be seen in the battery compartment. Just remove the battery from there and note down the SSID and security key value on a piece of paper.
Next, turn on WiFi on the device like your mobile phone, desktop, or laptop computer you wish to connect to the JioFi.
On your device, search for the nearby available WiFi network. After the search, a list of available networks will be listed. Select the JioFi network form there.
It’ll ask for the SSID and security key. Carefully enter the parameters in the respective fields and connect to the network.
You can comment on more than 10 devices at the same time, but my recommendation is just to connect less than 10 devices to prevent bandwidth crashes and to enjoy a high-speed internet connection.
Bottom Line
We always look at the security features in all aspects of life whether it is while traveling, using mobile phones, caring for the children, etc. We always thought that it was not necessary to have a secure WiFi network in our small home assuming that no one could misuse it. But it is provided as a feature to update the username and password, so we can prevent the chance of misusing our network.
Suppose, you have shared the SSID and password for one neighbor, they can share the same login credentials with other people. So, there is a chance that more people connect to your WiFi. By updating the SSID and password, you can prevent them from connecting to your network which provides high-speed internet to you because only limited devices are connected to the network.
Hope you got how to change the user ID and password with the Jiofi.local.html. If you have any queries, don’t hesitate to ask in the comment box.
Related Posts:-


